One of the most common DBAs tasks is databases backup and restore. We do this to test the backups, to refresh test databases, to migrate the databases etc. For some of the tasks we have scripts, for others we need to create scripts on the fly.
Here I would like to share with you a simple script that you will need to run in SQL Server Management Studio’s (SSMS) SQLCMD mode. This script will allow you to create the backup, copy the backup file and restore it on the different server – all from a single SSMS window.
Start new query in SSMS and under “Query” menu select “SQLCMD Mode”:
Run this script (replace host name and SQL Server Instance name for the source and destination variables):
Note, that I commented out the “MOVE” option. Remember to add it to the script if your destination database files’ locations are different from the source.
There was a user question on how to shrink the log files with dynamic SQL (without hard coding databases names). The script is provided below. But first – make sure that you size the log files properly (large enough to grow) and make sure that you backup regularly the log files (or use simple recovery mode). And do not truncate the logs, shrink them just to the size you need. So, if my log files do not usually grow larger than 4 GB I will use the following script:
SET NOCOUNT ON CREATE table #tran_log_space_usage( database_name sysname , log_size_mb float , log_space_used float , status int ); insert into #tran_log_space_usage exec(‘DBCC SQLPERF ( LOGSPACE )’) ;
delete from #tran_log_space_usage where database_name = ‘Exclude_DB’
EXEC dbo.sp_msforeachdb ‘ DECLARE @log_file VARCHAR(150) IF (SELECT DB_ID(”?”)) > 4 and (SELECT DATABASEPROPERTY(”?”, ”IsOffline”)) <>1 BEGIN PRINT ”?” IF (select log_size_mb as LogSizeMB from #tran_log_space_usage where database_name = ”?”) > 4048 BEGIN select @log_file = name from [?].sys.database_files where file_id = 2 USE [?] DBCC SHRINKFILE (@log_file , 4048) END PRINT ”/*********************************/” END’
DROP table #tran_log_space_usage
You can add exceptions for the databases as well (see ‘Exclude_DB’ in script).
I am not sure if this is a bug or an issue with BOL documentation, but BOL says here http://msdn.microsoft.com/en-us/library/ms186865.aspx: “(CHECKSUM) Specifies that the backup operation will verify each page for checksum and torn page, if enabled and available, and generate a checksum for the entire backup. This is the default behavior for a compressed backup”.
So, let’s run some tests.
Create three backups: backup a database without compression, then backup a database with compression and finally backup it with CHECKSUM:
BACKUPDATABASE msdb TO DISK = ‘K:\BACKUPS\msdb_compressed.bak’
WITH COMPRESSION, COPY_ONLY
BACKUP DATABASE msdb TO DISK = ‘K:\BACKUPS\msdb_NOT_compressed.bak’
WITH COPY_ONLY
BACKUP DATABASE msdb TO DISK = ‘K:\BACKUPS\msdb_CHECKSUM.bak’
WITH CHECKSUM, COPY_ONLY
Run RESTORE HEADERONLY for the backups created without CHECKSUM:
RESTORE HEADERONLY FROM DISK = ‘K:\BACKUPS\msdb_compressed.bak’
RESTORE HEADERONLY FROM DISK = ‘K:\BACKUPS\msdb_NOT_compressed.bak’
Actual results: Both results have “HasBackupChecksums” column equal to 0.
Expected Results: Expecting “HasBackupChecksums” column to have value equal to 1 for the compressed backup (based on documentation).
Run RESTORE HEADERONLY for the backup created with CHECKSUM:
RESTORE HEADERONLY FROM DISK = ‘K:\BACKUPS\msdb_CHECKSUM.bak’
“HasBackupChecksums” column is equal to 1 as expected.
It does not look that CHECKSUM enabled automatically when COMPRESSION is enabled for the backup.
So, the questions are:
Is this the documentation issue?
Does compression really automatically enables checksum for the backups?
I have sent these questions to Microsoft, so if you want to know the answers as well – come back later. I will publish thier response as soon as I get it.
Disk space these days is not as expensive as it used to be, but as a DBA I like to keep things tidy and optimize as much things as possible. Cleaning up databases and old backups, archiving databases are some of my regular tasks.
There will be a couple examples on MSDB database cleanup in this post with screenshots and reports.
MSDB database contains a lot of historical records related to the email, backups and maintenance plans. It does not usually grow too fast, but it may have a lot of historical information in large environments. If you do not maintain the history properly msdb sometimes can have years of history.
Keep in mind that some of the historical information is required for databases restores, for audit, etc. So, before you start cleaning up your database make sure that this does not go against your policies. Some DBAs base their restore scripts on the msdb database’s tables, this also has to be taken into consideration.
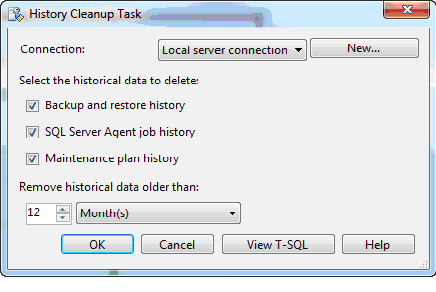
Some settings for the job history could be found under SQL Server Agent. Ideally you would setup “History Cleanup Task” using Maintenance Plans in SQL Server Management Studio (SSMS). This is quick and easy way:
But there are circumstances when you may need to do this manually, for example: SQL Server Agent is disabled on SQL Server; you inherited old SQL Server where history has not been cleaned up since server setup. Also, keep in mind that “History Cleanup Task” does not include Database Mail logs.
Manual Cleanup
Audit requirements in this example will be to keep 6 months of historical data and 6 months of backup history (based on Service Level Agreements). This is not real life scenario that we will be only using it to demonstrate database size changes after the cleanup.
I would like to keep email sending log for the last 6 months as well as evidence for auditors that I get e-mails about critical system errors.
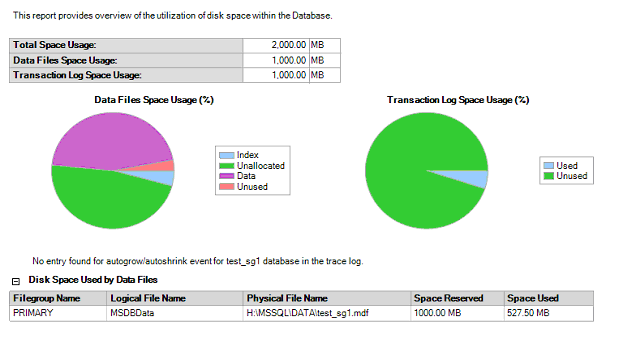
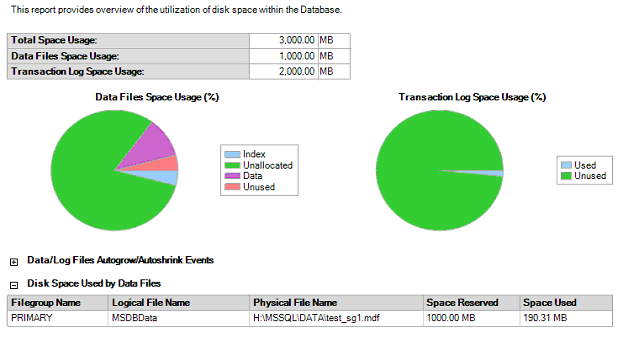
Here is the msdb database size on SQL Server with 50 databases and 1 year of history:
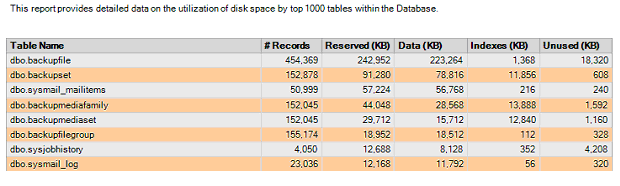
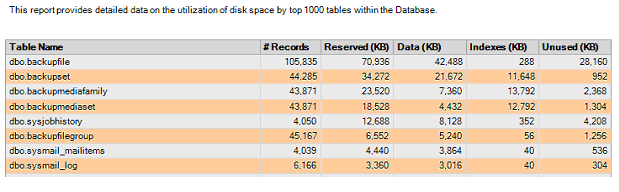
Let’s run SSMS report showing Disk Usage by Top Tables:
Step 1: Backup-restore history cleanup
This is done by executing sp_delete_backuphistory stored procedure. Here are the tables affected (as per BOL):
“… sp_delete_backuphistory must be run from the msdb database and affects the following tables:
backupfile
backupfilegroup
backupmediafamily
backupmediaset
backupset
restorefile
restorefilegroup
restorehistory
The physical backup files are preserved, even if all the history is deleted.”
This is done by executing sp_maintplan_delete_log stored procedure.
The sp_maintplan_delete_log stored procedure permanently deletes entries and details from the Maintenance Plans log (msdb.dbo.sysmaintplan_logdetail and msdb.dbo.sysmaintplan_log tables).
Today I would like to share with you my solution on how to set up an automated trace files’ backups.
How many times you thought: “If I set this audit last month I would know who changed the server configuration”. Unfortunately sometimes we are too busy with our day to day work or do not think that we will ever need to check who changed that specific option on SQL Server and when it was changed. One of the reasons could be that nobody has access to the SQL Server except you. Or you know what you do and documented every one of your steps. But what about those new applications that require sysadmin privileges on SQL Server to install applications and databases? You ask vendor what are the requirements and their response is: “SQL Server 2005 or higher”. And then you discover that installation process actually changed your SQL Server configuration to enable CLR.
This is not real life example, but very close. It took me a couple of hours to go through the tape backups to find out when I changed the server configuration, because I could not remember changing it at all! So, it WAS an application installation.
The first problem when you go through the tape backups is that it is very time consuming. The tape could be offsite; you need to involve backup guys. The second problem is that the trace file we are looking for may not even be on the tape, especially if you backup trace files only once a day. The number of trace files is limited to five files and the new file is generated when file’s size reaches 20 MB. At the same time the oldest file is deleted.
There are lots of solutions out there to have specific records imported to a database from the trace file. One of the latest articles by Aaron Bertrand could be found here:
But this does not quite work for me. I do not know what I may need next time, so capturing just specific records do not really work for me. Considering that I use DDL triggers for audit and that I need to check old trace files probably once a year, I do not want to import all records to the database, because this is another database to support and this includes backups, maintenance etc.
To save myself time when I needed to check something the next time I came up with solution to backup trace files. This solution will allowed me to make sure that ALL trace files are on the tape backup as well as allow me to will keep an archive of the trace files on the server for the quick access. The solution has been designed and tested for SQL Server 2008 R2.
We want to have all archived Default Trace files on the same server, but in different folder. The files that are archived would also be compressed (zipped).
A little challenge here is that we cannot backup the latest trace file because it will be still in use. We can will only backup “closed” traces.
Components/Requirements:
Archive folder on the server (make sure that SQL Server account or account that will be used to run the archiving job has rights to create and delete files in this folder). To make the scripting more generic I have created the folder under the “Log” folder (location of the Default Trace on your SQL Server instance).
WMI SQL Server Alert.
SQL Server Job to respond to alert (modify job to backup files).
SQL Server Agent “Replace tokens for all job responses to alerts” option is enabled.
Database mail set up.
Operator exists to get test e-mails.
Gzip utility to “zip” archived files.
Note: 5 and 6 only required for the testing. You may skip testing part as this is just to demonstrate files rollover process and response.
Implementation Steps (including testing):
This solution requires SQL Server Agent option set to “Replace tokens for all job responses to alerts” which may not be desirable if you are running a very secure environment.
OR set it up using SQL Server Management Studio through the SQL Server Agent Properties:
Note that if SYSTEM account has been removed from logins or SYSADMIN server role you may have issues with WMI alerts.
First we need to find location of the Default Trace on your SQL Server instance:
SELECTLEFT(path, LEN(path)-CHARINDEX('\', REVERSE(path))) FROMsys.tracesWHERE id = 1
Now – create subfolder for the archived trace files (it could be any other folder that you want to backup to the tapes):
Create job to test/confirm that WMI event (trace file rollover) triggers e-mail and that “Replace tokens” option has been configured properly and works. You will need to replace @notify_email_operator_name parameter’s value and @recipients e-mail in the script below. Also replace @profile_name with your DB Mail profile. Remember, that we are just testing WMI now. Do not test this in your production environment!
USE [msdb]
GO
BEGIN TRANSACTION
DECLARE @ReturnCode INT
SELECT @ReturnCode = 0
IFNOT EXISTS (SELECT name FROM msdb.dbo.syscategories WHERE name=N'DBA'AND category_class=1)
@job_name=N'WMI Response - Default Trace File Rollover' -- name of the job created in step 4
GO
Note that @wmi_namespace will be different for the named instance (example: \\.\root\Microsoft\SqlServer\ServerEvents\INSTANCENAME).
Initial testing.
It may take some time to get response from this alert when you test this. This will depend on how busy your system is (how often trace files reach 20 MB size). It may take actually several hours on your test SQL Server. To speed up trace files generation I run this script when I do my testing (it runs about 2 minutes on my test server):